Saprobia || Introduction Part 2

The words from the first part of my introduction to this project describe the biogeochemical cycles continuously occurring over time in natural ecosystems.  Rarely do we think of a tree as a product of the growth and death of all other trees in that place before it... Perhaps as the offspring of another tree's seed, but rarely as an organism nourished by the same building blocks that it will one day again become... in order to support life going forward.

Saprobia communicates this idea through the representation of a tree as a decomposer organism that would contribute in returning it to the soil to continue the cycle.  The project manifests as an installation of various forms of fungi, each constructed from components of a certain species of tree.  These saprobic representations of a species connect the viewer's perception to the continuity of forest mineral cycling and the interconnectedness of all organisms in an ecosystem, past and present.

Saprobia poses the question of what is next for the elements that once comprised a plant. How will they contribute to other life going forward? How can so small a thing have such an impact? The balance and interaction within nature transforms into a muse for our rejuvenation and strength.

For a number of weeks going forward, up until the installation in October, I will share a little about each saprobic form created for this project. All parts of an ecosystem depend on one another in the delicate balance of the environment.  Natural intelligence guides phenology harmoniously, in a magnificent symphony of self sufficiency.  How remarkable it is that we get to witness this strikingly mysterious collaboration of life.

Photos: 1. dye jars with baldcypress leaves, eastern red cedar heart wood, and black walnut hulls 2. working with honeylocust leaves 3. knitting with seed of cottonwood


52 Forms of Fungi || #20

This mushroom holds a special place in my heart.  While I have no idea what species it is, this is a replica of one of my favorite mushrooms that I encountered on my visit to the Pacific Northwest last summer.  We were on a coastal trail surrounded by ferns and, well, mosquitos, and there was an eerie darkness under the trees near the creek bank where it was found.  I won't forget that moment for a long time.  Blackish red russula?  What do you mycologists think?  The actual mushroom was a little more reddish than my interpretation.

This structure was knitted as part of my 52 Forms of Fungi project, through which I will knit a different type of fungi for every week of 2013. Check out more of the forms from this project.


IMG_3992
IMG_3990

Solar Dyeing || #3

Smooth sumac is a common thicket-forming tree here in Oklahoma, usually found on the edge of prairie and disturbed sites such as roadsides.  It's native, and pops up in these areas as a primary succession species to make way for the slower growing, more shade tolerant trees of our native forest type.  In the fall, these trees really stand out because of the large clusters of bright red berries that form at the meristems.  When I first tried out natural dyeing, I thought of these berries and how curious I was to see how they would work.  Here we are in late summer, and I finally got my chance!
To start, I picked the berries off of the stems and then boiled them in some water to extract the pigment. I may get a larger jar later and put some berries in it with the dye mixture, but the lace weight skein of yarn I used was a little too large to fit in the jar with both the liquid and more berries, so this is why I left them out.  Mordants used: alum and vinegar.
Eventually I'd like to try cochineal, but this looks to be a nice light red dye from a plant native to my area.

Honeybee Activity

Several months ago I posted about the bee colony living in a huge hackberry tree in my neighborhood.  At the time I was excited about the amount of activity I was seeing; however, that activity was nothing compared to now.  The mild weather this summer must have really benefitted our neighborhood honeybee colony.  This comes as a huge relief since Colony Collapse Disorder places a veil of uncertainty over the longevity of any bee colony.  Needless to say, it fills me with joy to walk by and see something like this.  Keep on keepin' on, little guys!  Pollinate the heck out of things!  Live life to the max!  If I could fist bump a honeybee with no ill effects (to either of us), I would.

Saprobia || Introduction

The biota of a forest ecosystem continuously adapts in a self sustaining cycle ofgrowth, reproduction, decline, and renewal. Trees originate from tiny, energy packed seeds - an acorn, a legume. As it grows, a tree is consistently supported by rich mineral soil and moisture retained by organic matter. While debris falls due to conditions surrounding an individual plant, it takes on new life on the floor to impact all other organisms extending their roots to that locale. Broken down by saprobic organisms, trees that lose vitality become the insulation that provides security for water uptake by other trees’ roots. They become the minerals that nourish plants for generations forward. Life feeds life, and all parts of the ecosystem support each other in the continuity of ecology, perhaps in a different form but always present.

Weekend Workspace || 8-18-13

Pine needles.  That's pretty much the extent of my weekend-- lots and lots of pine needles.  Tweaking my methods of working with this material has taken a lot of trial and error, but I've gotten it down to a pretty comfortable (and effective) rhythm.  It's interesting to see how different the pieces look when they're just finished and still damp, as opposed to after a day or so once they've dried.  I'm looking forward to observing the change continue as the needles completely dry out and turn brown.
The piece you see above will form the cap of a mushroom constructed from materials harvested from loblolly pine trees.  This tree species will make up the first segment of Saprobia, an installation for Momentum Tulsa this October.


Prairie Coneflower Naturally Dyed Yarn

It's been nearly two months since I visited this field of gold, sunny prairie coneflowers.  It felt like the field of poppies in the Wizard of Oz... except... they weren't poppies.  And I didn't feel compelled to take a nap.  So maybe it wasn't anything like that, except for my overwhelming awe at the seemingly solid blanket of color.  After collecting a huge bouquet I started a solar dye jar that afternoon, as you may have read about here.  The dye stuff included seed heads and petals, with mordants of alum and vinegar.  One of the best parts about the solar dyeing process is watching the transformation take place, first of the water's hue and then of the yarn itself.  I half expected a yellow shade to develop, or at least a yellow-green.  Instead, after a week or two it became apparent that the dye stuff exuded more of a bluish-green, sagey tone.  Here is the result:
Faint, but lovely.  The gold splotches, I believe, came from dyestuff residue on the sides of the jar where the yarn was pressed up against it.  I may have been able to remove the yarn a couple of weeks earlier than I did, which could have prevented this.  It adds character though, which I am all about.  So... in case you ever thought about dyeing with coneflower, this is what you might get!  What should I make with it?

Rain Does Wonderful Things

August in Oklahoma normally means everything is dry, brown and on its way into dormancy.  We've had way more rain this summer than in the past couple of years (really, that's an understatement), and warm temperatures with a lot of moisture equals fungi!  Here are some little scenes I got really giggly geeking out over last weekend when I was foraging for my Momentum Tulsa installation.  I need to look up the red ones from the second to last photo.  Some knitting might be in order for those...


Weekend Workspace || 8-11-13

In additional to loblolly pine, I've also started working with materials from honeylocust trees.  The forms created from honeylocust are reminiscent of the pieces I knitted for my Decomposition: Colony installations.  Since smaller scale forms have a greater impact in large numbers, this particular "species" will likely encompass one of the largest groupings of the installation.
Acquiring these lovely thorns and branches required a hike in the forest, which I haven't experienced enough of lately in my disdain of summertime heat.  I, of course, took a million photos of fungi and stopped to look at every rotting log.  The rain this summer has resulted in an impressive amount of mycological activity, so I've resolved that a "just for fun" hike is in order in the very near future.  I hope you got to enjoy the outdoors this weekend too.

Momentum Tulsa Spotlight Artist

I've been hinting around enough, but haven't actually officially announced my recent big news... Earlier this summer I submitted a proposal and was selected to be one of three Spotlight Artists for the Momentum Tulsa exhibition that will open in October!  This is a huge honor and I am so thankful to Oklahoma Visual Arts Coalition and the curators, Emily Kern and Krystle Brewer, for this amazing opportunity!

You will find out more about my project, an installation entitled "Saprobia", as the weeks go on.  I plan to continue posting workspace snippets and progress photos.  This project has already pushed me to try out new techniques and media that I have not worked with before, which has been both enlightening and inspiring.

I'm excited to share more about  my installation, the individual pieces that will be a part of it, and the greater concept that it embodies.  For now, here are a couple of images from recent stages.

Wall Hangings || Riot II

IMG_3697
IMG_3699
Typically, my work is very setting based, and most often it is impermanent (or really always... until now).  Aside from showing installations that will be removed or immortalizing them with photographs, I had not explored other avenues to make my work accessible for people to view in person until recently.  I currently have two wall hangings up in Coffee Slingers, my favorite coffee shop/roaster in Oklahoma City, in addition to several framed photographs of past installations.  The piece shown above is "Riot II", an extension of the "Decomposition: Riot" installation from April of this year in southeastern Oklahoma.  I used Jack-O-Lantern fungi forms for the piece, as well as bark shed from an elm tree.  The bark is a story in and of itself.  I love how the wall hangings turned out, and will most likely be making more of these.
If you are in the Oklahoma City area and would like to stop by and see my show, it's up for the full month of August.  Coffee Slingers is located at 1015 N Broadway in Downtown Oklahoma City.  Another post is to come with images of the second wall hanging.

52 Forms of Fungi || #19

I've been working diligently on these for several weeks now to incorporate into a wall hanging (more on the finished product soon).  These are one variation on turkey tail fungus.  I'd like to make more using a different color palette - when you look up photos of this species there are so many different shades and patterns.  I love the contrast!
This structure was knitted as part of my 52 Forms of Fungi project, through which I will knit a different type of fungi for every week of 2013. Check out more of the forms from this project.
IMG_3685

Dye Jar Progress

Since summer is now in full swing here in Central Oklahoma and we've been hitting heat indexes of over 100 degrees, my solar dyeing projects are coming along nicely.  The one on the far left, I started about three weeks ago using prairie coneflower bloom heads and petals.  The center one is osage orange extract, and the one on the right is bald cypress leaves.  These two on the right are for a big project I'm working on to show this fall.  All are mordanted with alum and vinegar.


As you'll notice at the bottom of the jar, after a day or two in the sun (or submerged, one or the other), the leaves start to lose their green hue and take on more of the copper color that you see in the fall.  I just removed the dye stuff from the top of the jar this morning and added some fresh leaves to get some additional pigment.  It seems to be coming out a bright yellow color.


While I would love to try dyeing with actual osage orange root, I had this extract and for the sake of getting some of these jars going I decided to go ahead and use it.  The shade is a beautiful, burnt orange.  Less red than the madder that I used last month.  It's going to add a lot of brightness to the project I'm using it for.


I've really loved watching the evolution of this jar.  After the first week in the sun, the water took on a deep purple hue.  When I started noticing the yarn taking on color, however, it looked more green.  Now, it almost looks like the coneflower heads have produced a blue-green color in the yarn.  I removed the dye stuff from the top of the jar and topped it off with water this morning.  It was a little cramped in there so the yarn was stuffed into the center... Hopefully this will allow it to spread out some and absorb more color in the center section.  This yarn has no project slated for it yet, so I will likely let it sit until the water looks clear and there is no more pigment to be absorbed.


On a side note, check out these stalks that one of my succulents is putting out!  I love watching these guys grow...


And finally, I'm happy to report that the bottom tier of the copper/moss tiered planter that I made last month is putting on new growth!  This dude will be cascading down the sides of the moss ball in no time!
I've got family visiting for the next few days (hello, three day weekend!) and am looking forward to some quality time and doing some fun things.  I hope you have a lovely weekend as well and I'll be back on Monday with a DIY!

52 Forms of Fungi || #17

I remember that as a kid I was always enchanted by fairy ring mushrooms.  Aside from the folklore, how did they manage to grow near one another in a perfect circle like that?  Something mysterious was at work.  Turns out, that something mysterious is just a common "root system", or mycelium, that the entire group sprouts from.  I still find them enchanting, despite my soon approaching cross-over into my 30's.  We need magic at every age...  Fairy rings are your mycological whimsy.
This structure was knitted as part of my 52 Forms of Fungi project, through which I will knit a different type of fungi for every week of 2013.
IMG_3492
IMG_3497
IMG_3501
IMG_3496

Weekend Workspace || 7-6-13

I'm working on many different things at once today, aided by my jitters-inducing, home-brewed ice coffee, which makes one ten times more productive than usual (or at least puts one in a better mood while they are doing it).  These are exciting times because I am starting to work on and plan out a really huge project for a show this fall!  I need to formally introduce it, but not today.  Just know that it's a concept I've been honing in my head for months now and thanks to the wonderful people at OVAC, it's going to happen.  More on this soon...
The logwood purple dye jar looked pretty effective about a week after I started it, but I just this afternoon opened it and rinsed the fiber.  The yarn is a deep purple jewel tone, with some patches of lighter hues where it was twisted for the skein.  I've got it drying on the porch now, and am fairly certain that it will make a beautiful shawl later in the year.
These little polypores above are for a new piece I'm working on to show next month.  It's another new execution for me, and so far I'm happy with the progress.
Well, back to it!  I hope you're having a relaxing and/or highly productive Saturday as well.

52 Forms of Fungi || #16

Aseroe rubra, or anemone stinkhorn, is one of those organisms where what appears to be land borne and sea borne collides.  Truly one of the wonders of nature, this beauty grows in the tropics as well as South Carolina (your confusion is as great as mine) where it has apparently been introduced.  The unique construction was a challenge but fun to create!
This structure was knitted as part of my 52 Forms of Fungi project, through which I will knit a different type of fungi for every week of 2013. Check out more of the forms from this project.
IMG_3476
IMG_3477
IMG_3473

Tutorial || Tiered Moss/Copper Hanging Planter

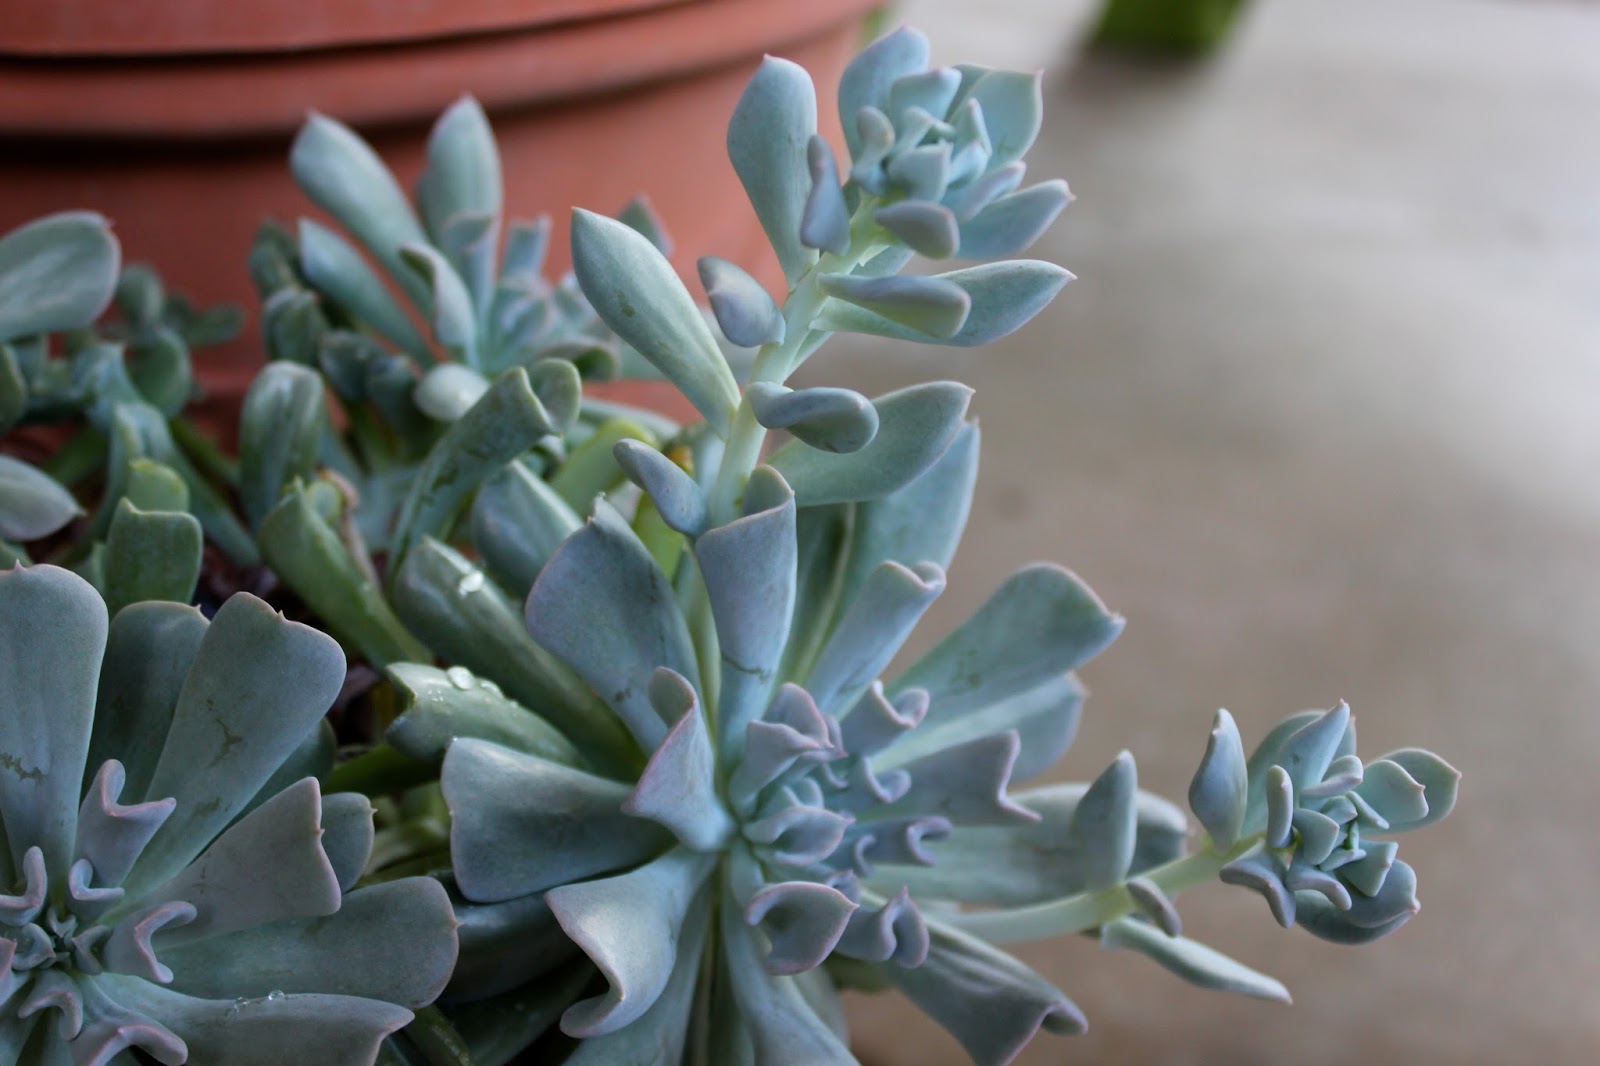
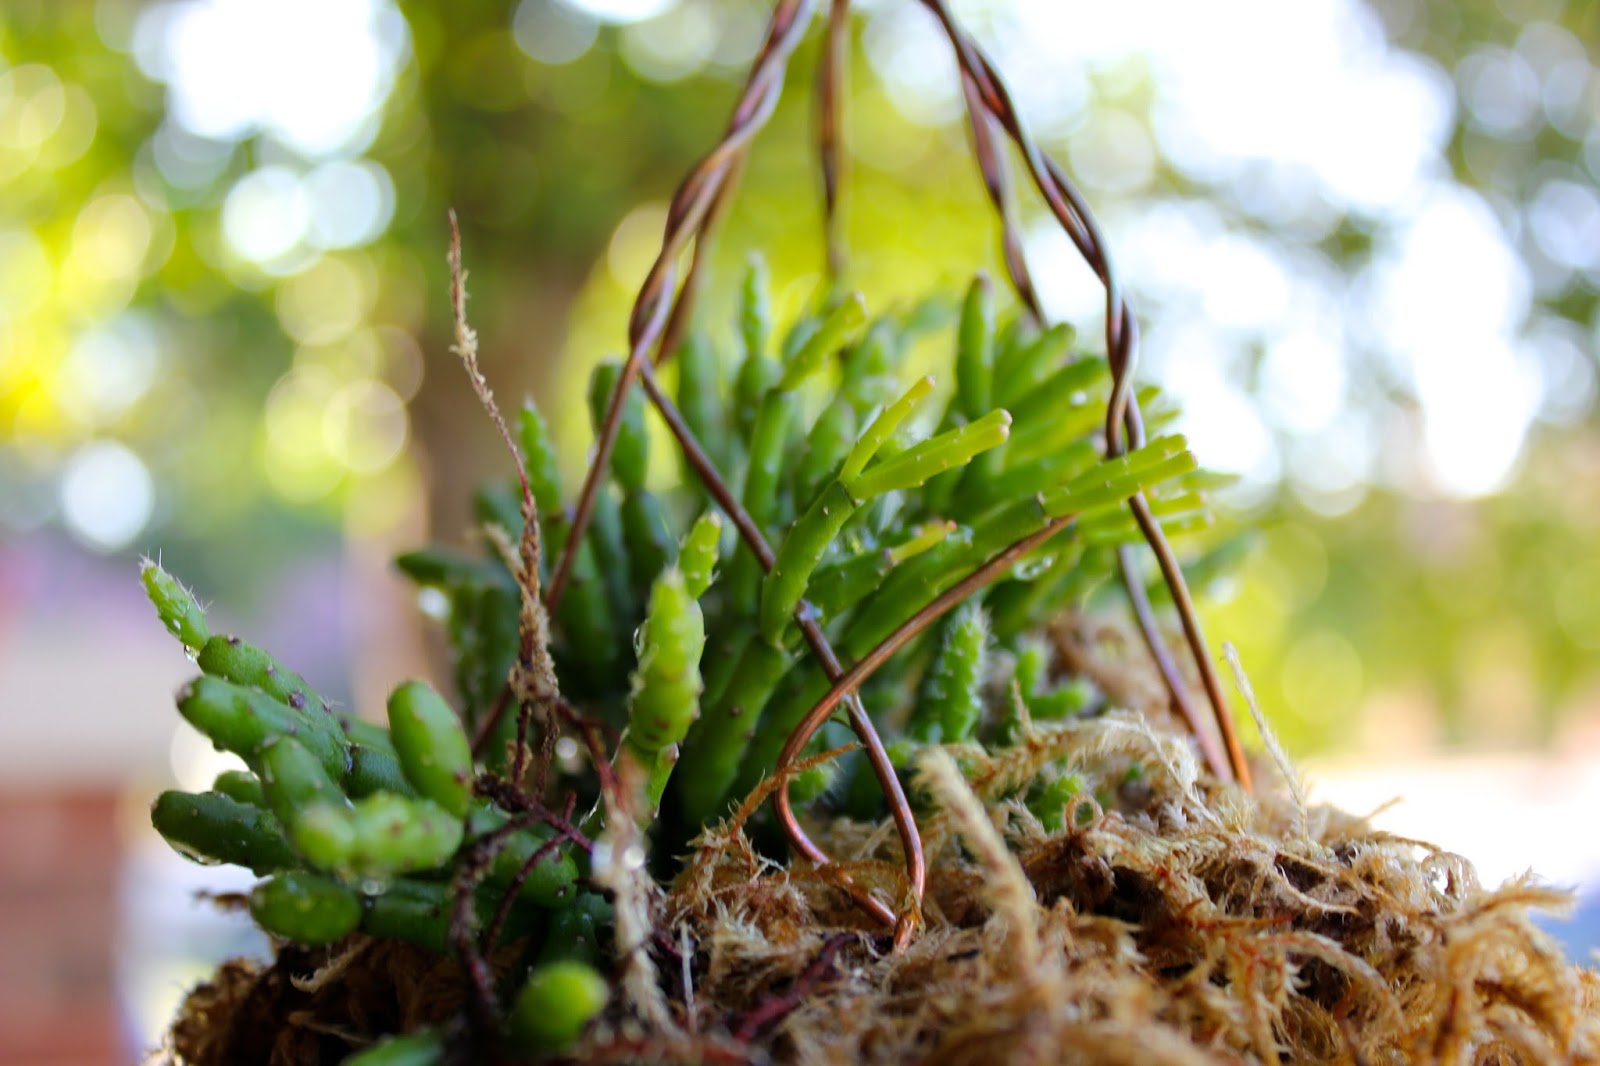
I'm all about a great way to display plants, and this planter idea has been floating around in my head for a while.  I'll try to keep it from making me want to buy ALL OF THE SUCCULENTS, but that's no guarantee.  This project only took a couple of hours and it's perfect for cascading succulents that like to dry out a little bit in between waterings.  The moss holds in moisture after you water it, however.  You can either hose it down gently (this is what I've been doing when I water my other containerized porch plants) or soak it in the sink or a bucket.  If you put this indoors, make sure that you hang it over the bathtub or something after watering to let it drain out completely... unless you just like having water all over the floor.  Just sayin'.
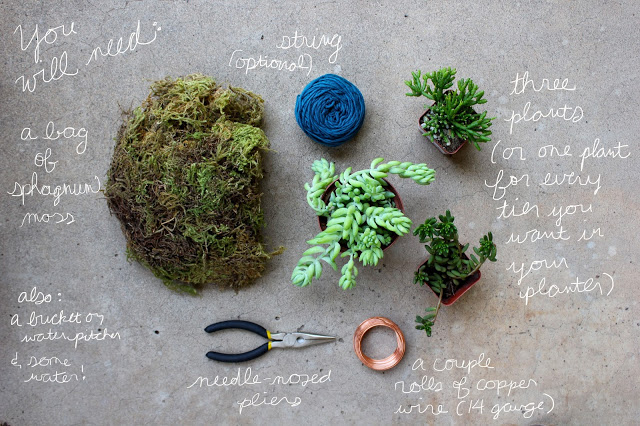
 

Materials needed:

A bag of sphagnum moss Needle-nosed pliers Approx. 50 feet of 14 gauge copper wire Three plants (cascading types that can handle drying out will work best) A bucket for soaking the moss, filled halfway with water Yarn/twine is optional if you would like to tie up the moss ball while you wrap your wire.


1.  Begin by cutting the copper wire into lengths of about 36 inches.  You will need five pieces of wire for each tier of the planter.  Meanwhile, soak the moss in a bucket.


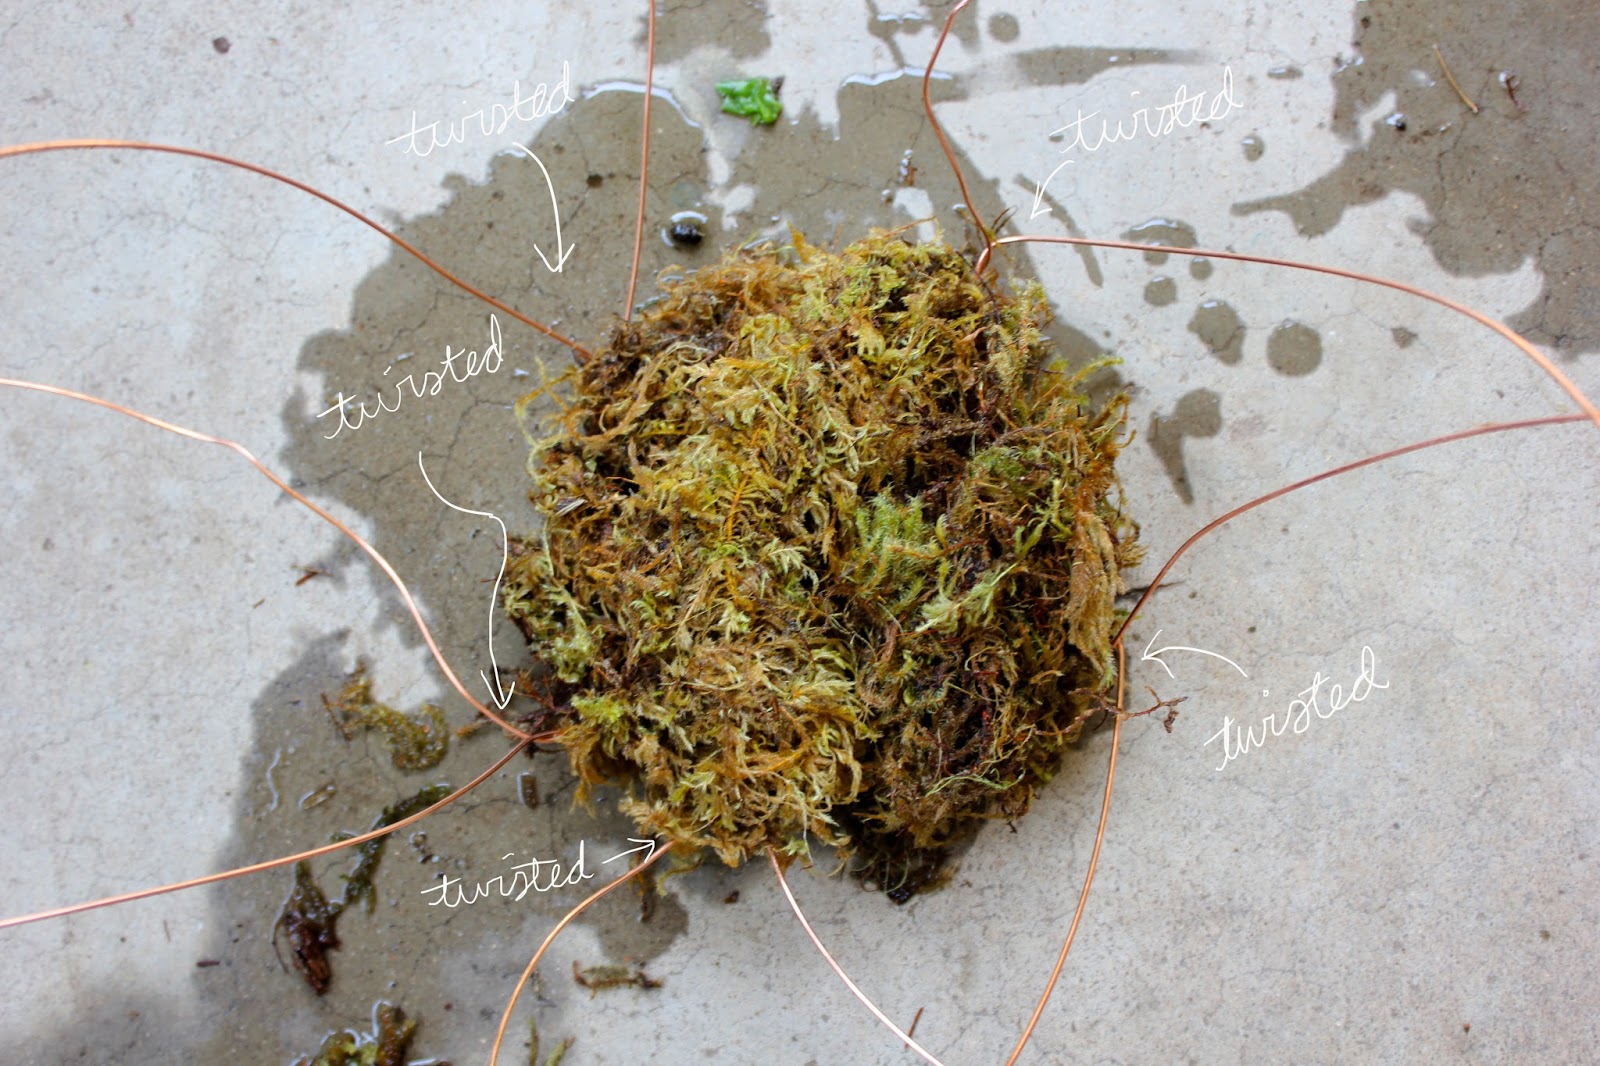
2.  Take five pieces of cut wire in a bundle and find the center of the length of wires.  Using the pliers, twist the wires around each other to form the center of the bottom of your planter.  Spread the wires apart in a circular/sunburst fashion.  You now have ten wires around the circumference of the center twist.


3.  Place a handful of wet moss in the center of the wires to form the foundation for your plant.
4.  Take two adjacent wires and twist them at the edge of the bottom of the planter.  They should still be spread apart from each other on the bottom to provide more support - just bend them toward each other at the corner to twist.
5.  Go all around the edge of the planter twisting sets of two wires to begin the side supports of the planter.
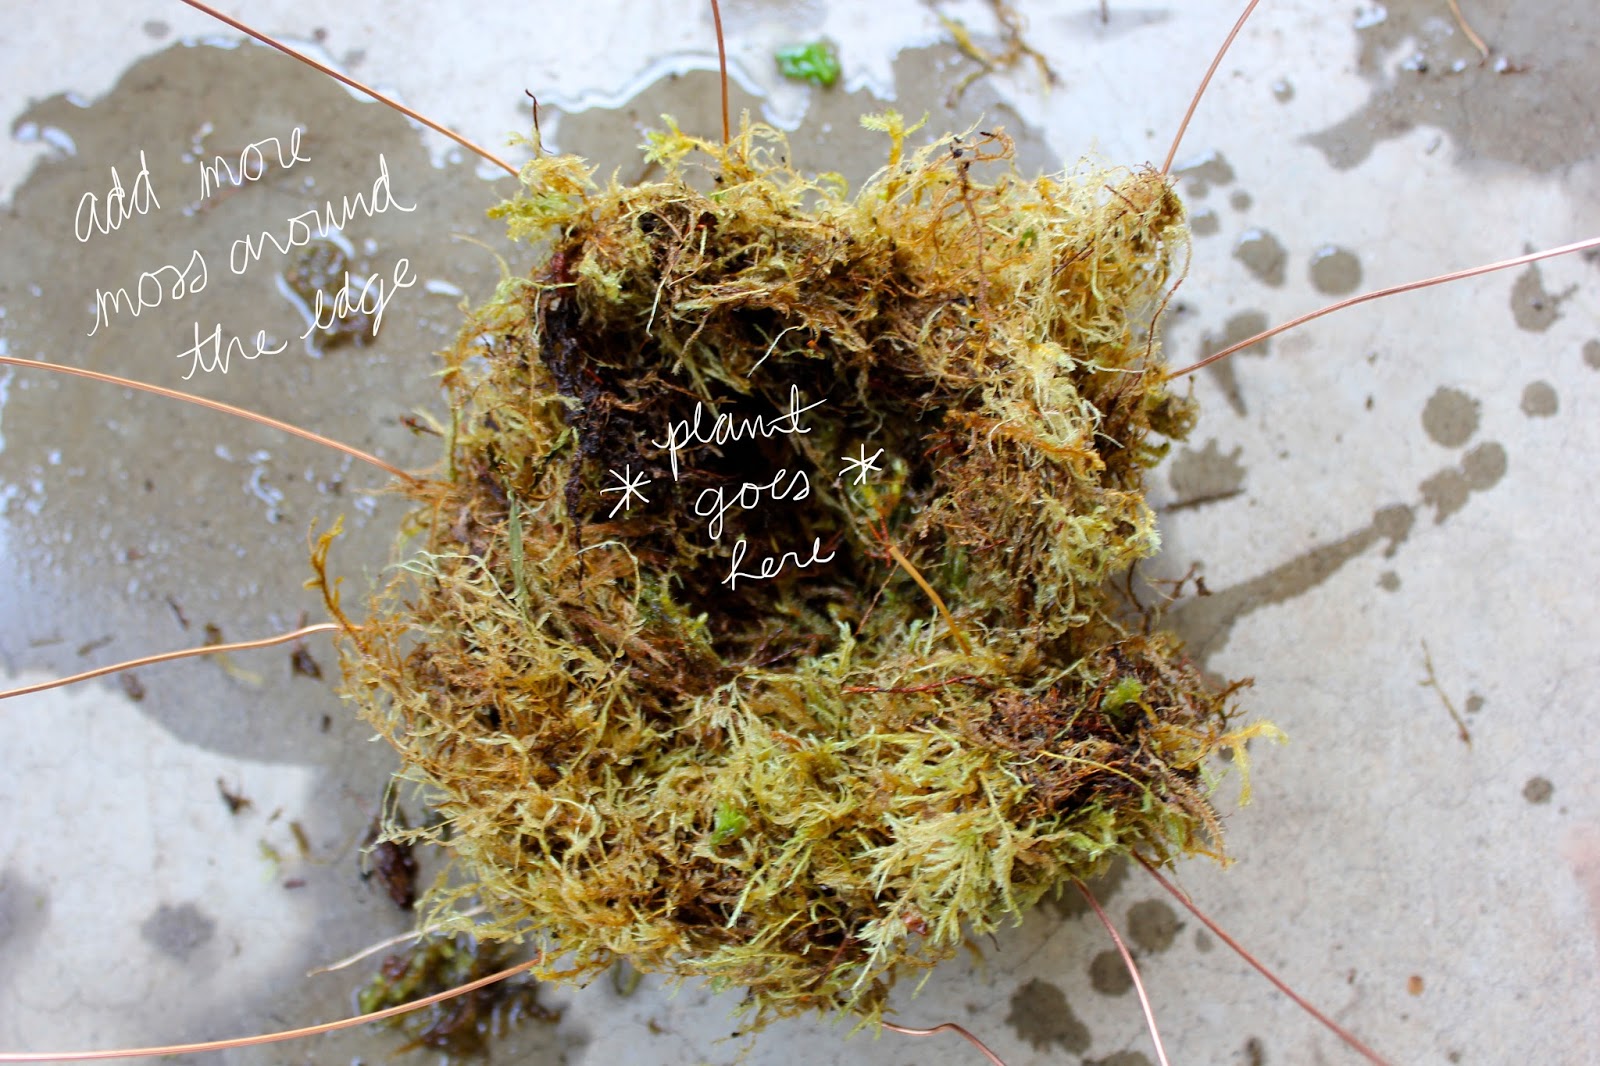
6.  Next, bend each wire in a set away from the other toward the wire on the other side.  Now twist these two wires together forming five new sets of wires.  Continue to repeat steps 5 and 6, adding moss around the edge as you go and leaving a pocket in the center where your plant will be inserted.
7.  Place the plant in the center pocket, and add more potting soil if needed.  Cover the top and sides with more moss.
8.  Continue twisting the wire at the sides until you have reached the top.  Gather all the wires, centered above the plant about 4 inches and join them together.  Using the pliers, twist the wires into one coiled wire.  For the top tier of the planter, make a loop with the coil and then twist the ends around the coil below the loop.  You can then hang it from a plant hook.  For the lower tiers, you can join them to the tier above by wrapping the ends of the coil around the wire twist on the bottom of the planter tier, and then securing it by wrapping the ends around the coil.


That's it!  Water once you notice the moss going dry.  What do you think?  Anyone want to make a guess at how many of these will be hanging on my porch by the end of the summer?!  :)
IMG_3456

Solar Dyeing || #2

Before I get into this - Seed Stitch Fine Yarn recently asked to interview me about the Decomposition series and 52 Forms of Fungi, and they posted this nice article last night.  I've had a couple of other interviews that I just realized were never linked on the blog - I'll compile those to share soon.  Moving on to the subject at hand.....
You may expect that this will become a regular inclusion in forthcoming blog posts.  I am in love with solar dyeing, and I don't care who knows it!  More than anything, I'm excited to experiment with different plants and mordants to learn as much about natural dyeing as possible... so here we go.
This is my second attempt at solar dyeing (you can read about the first project here and here), but it's my first attempt using actual plants that I harvested.  The first experiment incorporated some dye extracts processed by Earthhues.  This recipe includes prairie coneflower or Ratibida columnifera (thanks to Misti for confirming the plant ID - and by the way, if you're the type who is interested in natural observation and gardening, or you just like looking at beautiful photos of nature in general, you should really check out her blog. I enjoy it very much.)  I used alum and vinegar in the dye jar as well, and the fiber is Knit Picks bare Stroll sock yarn (100 g).
After just the first afternoon I noticed that the water was taking on a purplish hue, although I read that coneflower results in green.  We shall see!
Another jar with logwood purple extract, alum and vinegar is sitting out on the porch as well, although I did not get to take any photos of it.